Teacher Mode is accessed by pressing the "Teacher/Child Mode" switch in the top right hand of the screen in 2Email. The Teacher Mode interface is very similar interface to the Older Interface, but with additional options to help manage class emails. To access this mode, you must be logged in as a teacher or as an account administrator.
![]()
Email Features
Whilst in Teacher Mode, the In-box will show emails sent to the teacher from fellow teachers, children, and the Purple Mash Practice Users. From here, compose new emails, save emails to Favourites and approve or reject emails that children have sent, if approval has been enabled in settings.
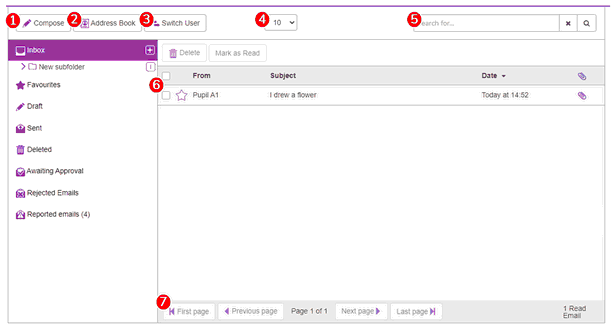
| 1. | COMPOSE: Click to open a new, blank email. |
| 2. | ADDRESS BOOK: Find contacts. In teacher mode, navigate through the Address Book and narrow down the search by class or group. The Teacher Mode Address Book is the same as the KS2 version. |
| 3. | SWITCH USER: Switching users will let a teacher access the Inbox of any of their children. This is the best way to assess work for 2Respond activities. |
| 4. | DROP DOWN: This drop-down menu will let the teacher choose how many items to display per page. The default setting is 10 but it can be set to to 25 or 75. This feature is available for both the In-box and Address Book. |
| 5. | SEARCH: The search bar is used to find emails by the name of the sender or in the case of emails, words in the subject line. This feature works for both the In-box and Address Book. |
| 6. | FAVOURITE: Use the star on the left hand side of an email to toggle that email as a Favourite. Once an email is starred, it is placed in both the Inbox and Favourites folder, making it easier to find. |
| 7. | NAVIGATE: Where there are multiple pages of emails or contacts, these buttons are used to navigate between the pages. The total number of emails in the current folder is displayed. |
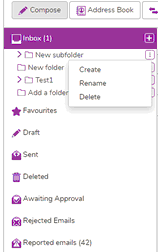
Folders: Create, rename and delete folders by clicking on the kebab menu in the folders area.
Sent Folder: Displays all sent emails with the name of the person or persons it was sent to. If more than one person per an email in a recipient then this will be indicated by a number. Click on the sent items to expand for details and see the message.
Read Receipts: See who has seen an email by going to the sent folder. Any recipients that have a green indicator have read the email, those with a red dot have not.
Email fields
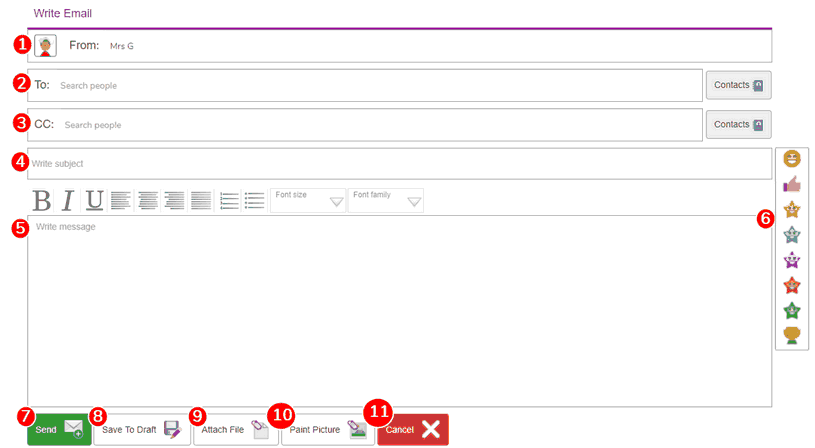
| 1. | FROM: This field is automatically populated with your name. It cannot be changed. |
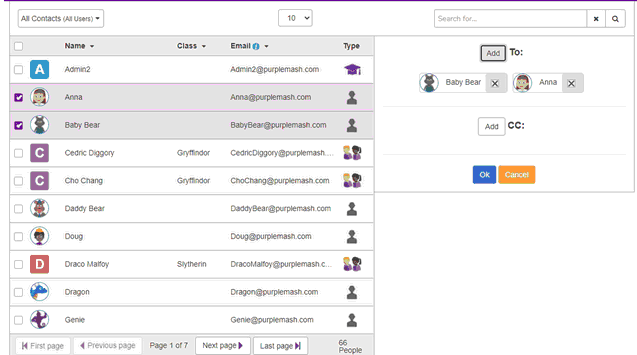
| 2. | TO: This is used to choose recipients from the Address Book. Emails can be sent to multiple recipients. To fill it, either select the Contacts icon which will open the address book screen allowing recipients to be chosen from the full list of contacts, or start typing the name of someone in the Address Book and select from the list of suggestions. Recipients will appear underneath this field, and can be removed by clicking the "X" to the right of the name. Teachers have the option to choose contacts from the whole school, specific classes, or Practice Users. |
Find the desired contact in the address book, tick the box to the left of their name and then use the Add button to add them to "To" field. Select multiple contacts by ticking more than one, or tick the "Select All" box to select everyone in a class or group. Pressing the "x" next to a contact's name will remove the contact from the "To" field. Press OK to add the email. Pressing Cancel will discard any changes made to the "To" or "CC" fields.
| 3. | CC: This field is used to choose recipients from the Address Book in the same way as the To field. It needs to be enabled by clicking the "Enable CC" button. Emails can be CC'd to multiple recipients. The recipients in this field will be able to see who the message was sent to and the names of the other recipients. The recipient in the To field will also be able to see the CC recipients. |
| 4. | SUBJECT: This field can contain words, letters, symbols, and Purple Mash emoticons. |
| 5. | WRITE MESSAGE: This field can contain words, letters, symbols, and Purple Mash emoticons. |
| 6. | EMOTICONS: Emoticons can be added into an email just by clicking them. The emoticon bar will only show if you have clicked into the Subject line or the Message box. |
| 7. | SEND: Pressing Send will send the message. |
| 8. | DRAFT: Pressing the Save To Draft button will save the email into the Draft folder. It is not sent. The email will remain open on the screen, and can still be changed before being saved to drafts again, or sent. Once the message has been sent it will no longer appear in the Draft folder. |
| 9. | ATTACH: Attach activities, games, writing projects or paint projects that have been saved in Purple Mash to an email. |
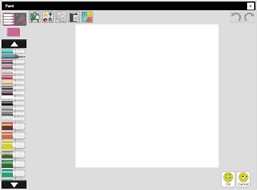
| 10. | PAINT: Attach a picture by drawing in the box provided. |
| 11. | CANCEL: Pressing Cancel will close and delete the email. A window will appear before the draft is deleted asking for confirmation that this is what the user wants to do. Navigating to any other folder (Inbox, Address Book, or Compose) will also bring up the warning reminding users that they will lose their draft work. |
Approving or Rejecting Emails
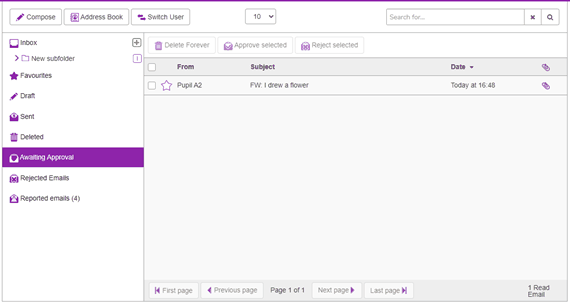
If the Email Settings allow children to email each other and are set to require approval before being sent. The folder Awaiting Approval will be populated with the children's emails.
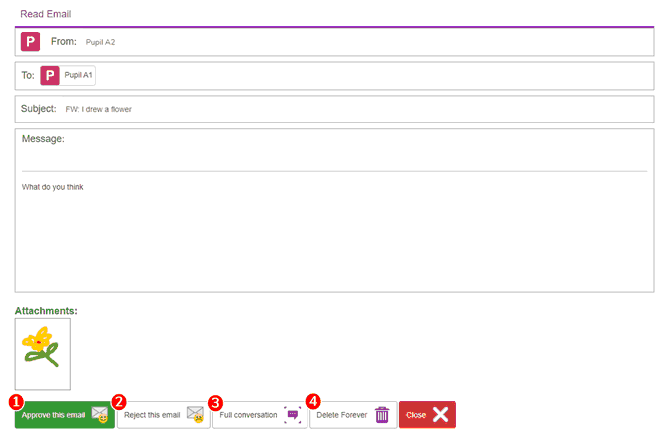
Select an email to read it.
| 1. | APPROVE: Click here to approve: The email will immediately be sent to the recipient. |
| 2. | REJECT: Click here to reject: A rejection message will pop up. Fill in the reason that the email is being rejected. The sender will receive the message in their own In-box, informing them that the email hasn't been sent and letting them know why it was rejected. |
| 3. | CONVERSATION: This button will show all the emails in this conversation thread. |
| 4. | DELETE: This will delete forever. |
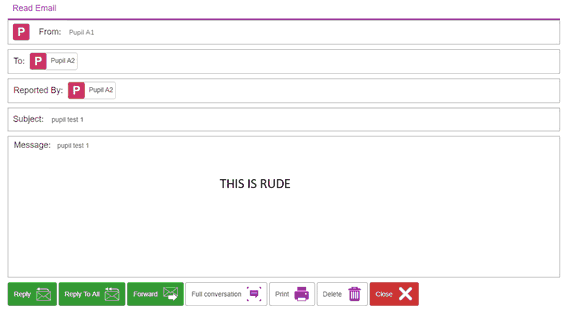
Reported emails
If the Email Settings allow children to email each other and are set not to require approval before being sent, children who receive mails that they believe are inappropriate, can use the Report to Teacher button. This will remove the email from all their folder and notify the teacher via their Reported emails folder. Teachers are also alerted of a reported email to their linked email address which adds another layer of safeguarding.
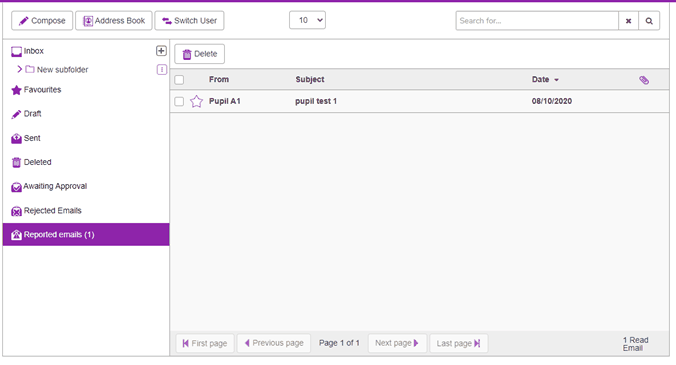
Opening a reported email shows who wrote the email, who it was sent to, and who reported it along with the contents of the mail thread.
Reviewing children's work
Review children's mails using the "Switch User" function in Teacher Mode to see any child's In-box.
![]()
Pressing "Switch User", will bring up a window containing all of the children.
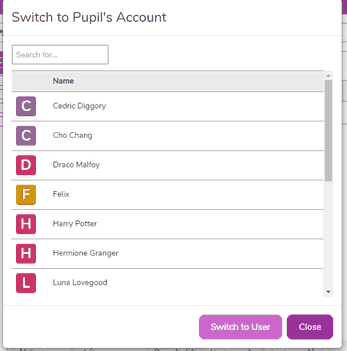
| 1. | Use Search to find a child. |
| 2. | Selecting the child, will change the current In-box to the chosen child's In-box. |
| 3. | Select Switch in the top left then Switch to original user to switch back. |

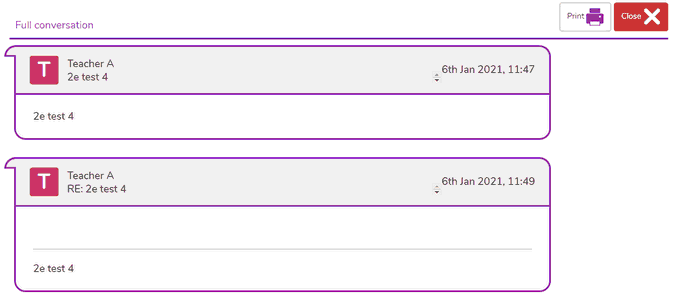
Full conversations can be reviewed by selecting an email in the child's In-box.

| 1. | REPLY: Pressing Reply send an email as the child whose In-box is being viewed. |
| 2. | FULL CONVERSATION: Press here to see all the emails and replies sent as part of this conversation. This is the best way to see a 2Respond activity for assessment. In Full Conversation View, the whole conversation can be printed using "Print". Close return to the original email. |
| 3. | DELETE: Delete the email from the child's In-box. |
| 4. | CLOSE: Go back to the child's In-box. |
To switch to another child, first, 'switch back' then repeat the process.
*It's important to note when impersonating an account (Switch User) teachers are able to see sent (From) messages from KS2 and KS1 interfaces in order to support online safety.