The following video will show you how to use the Import Wizard to add many pupils at once. You can also scroll down for a step-by-step guide.

Step by step guide: 1 - Preparation
The Import Wizard can mass-create users in Purple Mash using data from a spreadsheet.
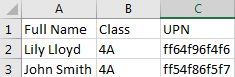
Firstly, create a spreadsheet with three headers: Full Name, Class and UPN.
Ensure these columns are filled for each pupil.
If you do not have access to the UPN (unique pupil number) you can use any other unique identifier for example abc1, abc2, abc3.
We can mass-generate usernames and passwords for you at a later step. However, if you wish to set them up yourself for example, to match other usernames and passwords that pupils use, you can add columns with the headers 'username' or 'password'.
You can download a sample spreadsheet here. Sample spreadsheet
Step 2 - Upload data to Purple Mash
Click on 'Pupils' on the left-hand menu.
Next, click on 'Import wizard'.

The Import window will open.
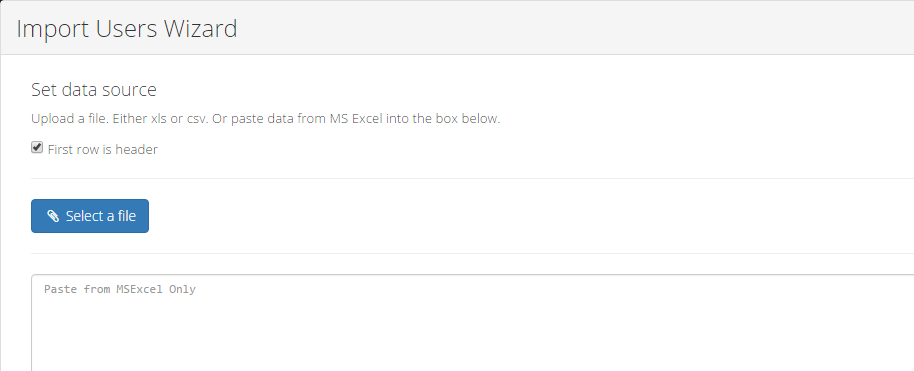
The 'First row is header' box is automatically ticked. If you have not added headers to your spreadsheet, you should untick this or the first user in your spreadsheet will be lost.
You have two options to put the data on your spreadsheet into Create and Manage Users:
| • | You can save your spreadsheet as a .csv file. Then click on 'Select a file' and select that csv file. This is a better option for large numbers of pupils where you have a big spreadsheet. |
| • | Or you can highlight and copy your pupil information, and then paste it into the box provided. |
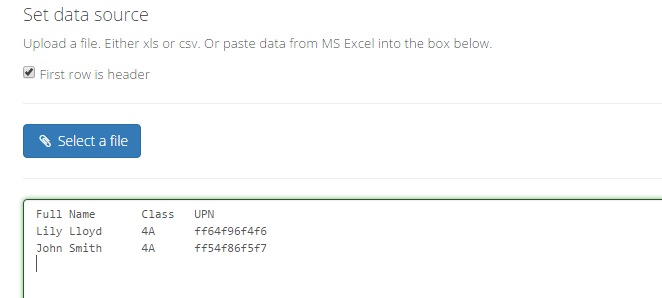
Your data may not align into neat columns but don't worry, this shouldn't be a problem.
Next you will be able to confirm that the column headers are matched to the correct data, e.g. that the column header 'Full Name' refers to a list of full names!
| • | The possible column headers are: Full Name, Forename, Surname, Username, Password, Email, Role, Shared folders, Class, UPN, Groups. |
| • | The only required fields are: either Full Name or both Forename and Surname, UPN. |
| • | However it is very useful to include 'Class' at this stage; it will save you time in having to do this manually later. |
| • | You may also wish to include Username and Password fields if you wish to match them to other usernames and passwords that pupils use. If you do not add usernames and passwords then you will have choices about which format to generate these in, later on in the import process. |

If a header is incorrect you will be able to click on the drop down arrow and choose the correct header title.
For example you may have used the header Name whereas the program will look for Full Name.
Any columns that the program cannot identify will be given the header 'Ignore' and will be removed at the next step unless changed.
Step 3 - Generate Usernames
After clicking next you will be offered 4 ways to mass generate usernames.
Options & Examples
| • | Use full names: LilyLloyd |
| • | Use initial: LL |
| • | Use forename initial + surname: LLloyd |
| • | Use forename + surname initial: LilyL |
Select your preference and then click next.

Step 4 - Generate Password
There are 5 different types of password that can be generated:
| 1. | 'Animals', 'Colours' and 'Things' generate a password that is a word followed by numbers. For example, selecting colours may generate the password red73 |
| 2. | 'Picture Pin' - this will appear to you as a 4 digit number at this stage of the process. However, the digits correspond to 4 pictures of animals that children can click on when they login. The pictures of animals will also appear on their login cards. This is an easier way for younger children to get used to remembering passwords. |
| 3. | 'Two Digit Picture Pin' - This generates a two digit password. This is a very simple password to remember. The password will also correspond to two pictures like the Picture Pin |

Once you have chosen your password type and clicked next you will be at the confirmation screen .
Step 5 - Confirm and Complete

Here you can check if everything is correct.
Rows appear in green when you are successfully adding a new user.
Rows appear in orange when you are editing a user that is already in the system. If this is not what you wish to do, you may need to change the username you have chosen.
Rows appear in red when there has been an error. If you click under the errors column, there will be an indication of why the users can't be added.
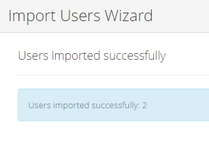
Finally, click 'Finish' and you will see the a confirmation of the users that have been successfully added. Make sure that this number matches the number of pupils you were expecting.